How to Make WordPress Website With Hostinger: Easy & Fast Guide
Creating a website can be fun. But it can also be confusing. This guide will show you how to make a WordPress website with Hostinger. Follow these steps, and you will have your site up in no time!

Step 1: Choose a Hosting Plan
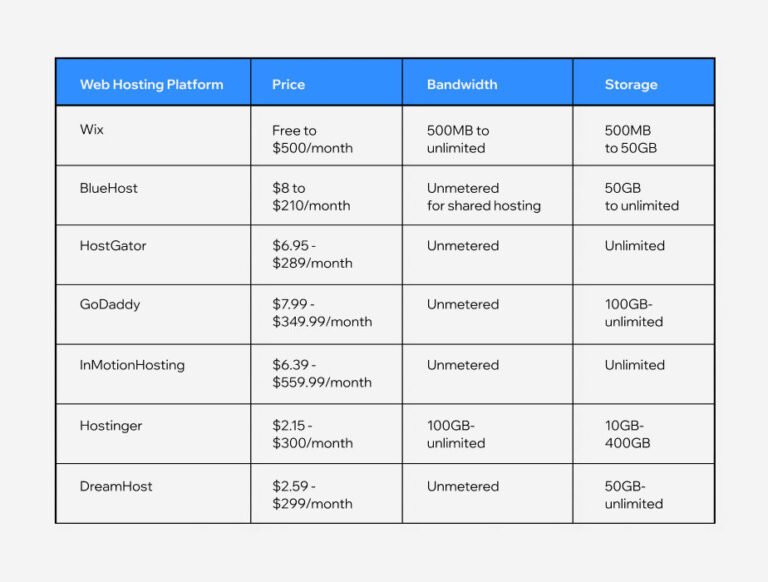
First, you need a hosting plan. Hostinger has several options. Choose one that fits your needs and budget.
| Plan | Features | Price |
|---|---|---|
| Single Shared Hosting | 1 Website, 30 GB Storage | $1.99/month |
| Premium Shared Hosting | Unlimited Websites, 100 GB Storage | $2.99/month |
| Business Shared Hosting | Unlimited Websites, 200 GB Storage | $4.99/month |
Step 2: Register a Domain Name
Next, you need a domain name. This is your website’s address. Choose a name that is easy to remember. Hostinger allows you to register a domain name.
Follow these steps to register your domain:
- Go to the Hostinger website.
- Click on “Domain” in the menu.
- Search for your desired domain name.
- If available, add it to your cart.
- Complete the purchase.
Step 3: Set Up Your Hosting Account
Now, set up your hosting account. Follow the instructions Hostinger provides. You will need to enter your personal information and payment details.
Step 4: Install WordPress
With Hostinger, installing WordPress is easy. Here is how you do it:
- Log into your Hostinger account.
- Go to the Control Panel.
- Find and click on “Auto Installer.”
- Select “WordPress.”
- Fill in the required information (website name, admin username, password, etc.).
- Click “Install.”
Wait a few minutes. WordPress will be installed automatically.
Step 5: Choose and Install a Theme
WordPress has many free themes. Choose one that fits your style. To install a theme:
- Log into your WordPress dashboard.
- Go to “Appearance” and then “Themes.”
- Click “Add New.”
- Browse or search for a theme you like.
- Click “Install” and then “Activate.”
Step 6: Customize Your Website
Now, it’s time to make your website unique. Customize it to your liking.
- Go to “Appearance” and then “Customize.”
- Change the site title and tagline.
- Upload a logo if you have one.
- Adjust colors and fonts.
- Add widgets to your sidebar or footer.
Take your time. Make sure it looks the way you want.
Step 7: Create Essential Pages
Your website needs some basic pages. These include:
- Home
- About
- Contact
- Blog
To create a new page:
- Go to “Pages” and then “Add New.”
- Enter a title and content for the page.
- Click “Publish.”
Step 8: Install Plugins
Plugins add extra features to your website. Some essential plugins include:
- Yoast SEO (for search engine optimization)
- Contact Form 7 (for contact forms)
- Akismet (for spam protection)
To install a plugin:
- Go to “Plugins” and then “Add New.”
- Search for the plugin you need.
- Click “Install Now.”
- Click “Activate.”
Step 9: Set Up Your Menu
Your website needs a navigation menu. To create one:
- Go to “Appearance” and then “Menus.”
- Click “Create a new menu.”
- Give your menu a name.
- Add the pages you created to the menu.
- Click “Save Menu.”
Step 10: Launch Your Website
Congratulations! Your website is ready to go live. Before you launch:
- Check all your pages for errors.
- Make sure your contact form works.
- Test your website on different devices.
When everything looks good, share your website with the world!

Frequently Asked Questions
How Do I Start A WordPress Site On Hostinger?
Sign up for Hostinger. Choose a hosting plan. Install WordPress using their auto-installer. Simple and quick!
Is Hostinger Good For WordPress Beginners?
Yes, Hostinger is user-friendly. It offers easy WordPress setup and great support for beginners. Perfect choice!
How Much Does Hostinger Cost For WordPress?
Hostinger plans start at $1. 99/month. Affordable options for different needs. Great value for WordPress hosting!
Conclusion
Creating a WordPress website with Hostinger is easy. Follow these steps, and you will have a beautiful website in no time. Good luck, and happy website building!